Korg NanoKontrol 2

Santa’s been kind and got me one the above for Christmas. I’m working on a mapping for it now, currently looking like this:

mapping.drawio

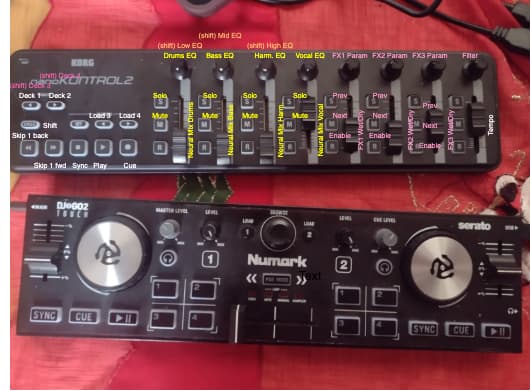
Basic workflow is that you select your deck, then all the subsequent controls are mapped to that - so you get 4 channel Neural Mix volumes, 4 channel Neural Mix EQ, 3 channel traditional EQ, full control of the Type + Param + Wet/Dry of the 3 FX, plus the filter. You also get some basic controls for play/sync/cue + jog + track select + tempo for all decks. This gives you some basic access to a 4 deck set up.

Not added to the diagram because it makes it too messy, but:
SHIFT + FX1 Prev = toggle FX1 to drums / deck
SHIFT + FX1 Next = toggle FX1 to harmonics / deck
SHIFT + FX1 Enable = toggle FX1 to vocals / deck
… plus the same for FX2 + FX3

I’ve mapped it to work nicely alongside the Numark DJ2Go2 Touch. 99% of the time I only use 2 decks, so the 4 deck thing is just a ‘nice to have’. Based on a couple of quick mixes today, it’s a pretty effective set up to convert the DJ2Go2 into a low-cost beast of a (2 deck) controller for Djay Pro, harnessing all of the (IMO) cool features of the software.

I’ve no idea how to export the mappings from an iPad, but as soon as I work that one out, I’ll post it up here. Or you could just map it based on the description above :slight_smile:

1 Like

One possible answer and one question:

ANSWER: EXPORT DJAY MAP FILE FROM IPAD
Mac Finder: Connect iPad to a Mac, open a Finder window, and select the iPad. In the Files tab is the djay item where djay stores .djaymapping files. Drag the nanoKontrol file to the Mac and then upload or whatever from there.
iOS Files: Launch Files app on iPad and select On My iPad, then djay, then the nanoKontrol file. From there it can be moved, copied, shared, etc.

QUESTION: NANOKONTROL2 LEDs TOGGLE ON
I’ve been mapping my nanoKontrol2 (nK2) to control effects and Neural Mix parameters. Mapping button / fader controls works great, but I can’t make LEDs on the nK2 to stay on as effects activation feedback.

Example is I want to map FX enable MIDI control as toggle on/off buttons via the “R” buttons on the nK2 (in other words, use nK2 R buttons to dis/enable all the effects). Once enabled, I want the R buttons’ LED to remain on to show the effects are on (inversely, once effect is disabled, the LED is off).

Any ideas on making LEDs on nK2 to remain on via djay mapping?

THINGS TRIED
In djay MIDI Device settings for the nK2, I’m mapping one of its R buttons to FX 1 Enable, Advanced Control Config > Type to Button / Button Mode to Toggle. Next MIDI Out to enabled with Advanced MIDI Out Config > Type to Control Change (CC) (also tried Note On/Off without success). See attached screenshot below.

When I mapped a Novation Launchpad to control djay’s Looper and Sampler, changing the Advanced MIDI Out Control > Min Value / Max Value allowed button light colors, brightness, and more to be changed. But these don’t seem to have any effect on the nK2.

Also tried the KORG KONTROL Editor via my Mac. It supports Global MIDI Channel with LED Mode > Internal/External (tried External). Each button also supports a Toggle setting (instead of Momentary). But setting these via the Mac doesn’t do anything after transferring to iPad (even if I save the File from The KORG Kontrol Editor and transfer to the djay folder in the iPad). I assume these Editor settings would only work when using it on a Mac and that the iPad can’t use it.

Found the solution! It requires affecting the button behavior as a Toggle on nK2 via the Korg Kontrol Editor software on a Mac or Windows PC and then selecting Hold (not Toggle) as the Control Type in djay’s MIDI device profile.

STEP A: Korg Kontrol Editor on a PC:

  1. Attach the nK2 via USB to PC.
  2. Launch the Korg Kontrol Editor and select the buttons desired to act as a Toggle (in screenshot below, I’m updating the "Record Button-2"with CC#65).
  3. Select Toggle under Button Behavior. Then, do this to all of the other buttons that need to be Toggles.
  4. In the Korg Kontrol Editor main menu, select Communication, then select Write Scene Data. An alert appears asking to confirm writing over data on the device. Select OK.

STEP B: djay Pro AI MIDI Device Configuration

  1. Launch djay with nK2 attached via USB, open MIDI menu and select the nK2 sub-item.
  2. Select a button that’s meant to be a toggle in the nK2 and an entry should appear in the djay MIDI device profile window.
  3. Select that new entry and then Show Advanced Control Options drop item at bottom of the window.
  4. THE TRICKY PART: Select Button and Hold next to Control Type. (If you select the more obvious Toggle instead of Hold, it makes the nK2 button require two presses to toggle something on and off in djay with the nK2 LED getting out of sync.)
  5. Do this for the rest of the toggle buttons desired and select Done to save and quit the MIDI device profile in djay.